The Complete Countertop Installation Process: What Happens From Template to Final Walkthrough
Professional countertop installation follows a structured five-phase sequence: precise digital templating capturing sub-millimeter measurements, 7-12 business day shop fabrication including CAD layout optimization and CNC cutting, homeowner site preparation ensuring level cabinets and clear access paths, installation day procedures including dry-fitting, adhesive setting, color-matched seam bonding, undermount sink mounting, and backsplash caulking, followed by sealing, cleanup, and final walkthrough sign-off confirming everything matches specifications.
Understanding each phase helps homeowners prepare properly, set realistic expectations, and ensure smooth installation day. From the moment the templater leaves your home to the final signature on the completion form, a good installer follows this structured path so countertops fit precisely, look finished, and are ready for years of use.
Professional countertop installation in Denver follows this proven sequence, ensuring precision fit and lasting performance through systematic quality controls at every stage.
Phase 1: After Template—What Happens in the Shop
Once the templater leaves your home, the digital (or physical) template drives all fabrication work. This behind-the-scenes phase transforms your measurements into finished countertop pieces.
Template Review and Confirmation
Before releasing templates to production, office staff confirm every specification matches your order:
- Stone selection, color, and specific slab assignment
- Material thickness (2cm or 3cm)
- Edge profile selection
- Overhang dimensions at peninsulas and islands
- Sink type and cutout specifications
- Backsplash height and thickness
- Cooktop and appliance specifications
- Faucet hole locations and quantities
Digital templates are imported directly into CAD/CAM software. Analog “stick” templates (used by some fabricators) are traced or digitized before layout work begins. Any discrepancies between template data and original specifications get resolved before cutting starts.
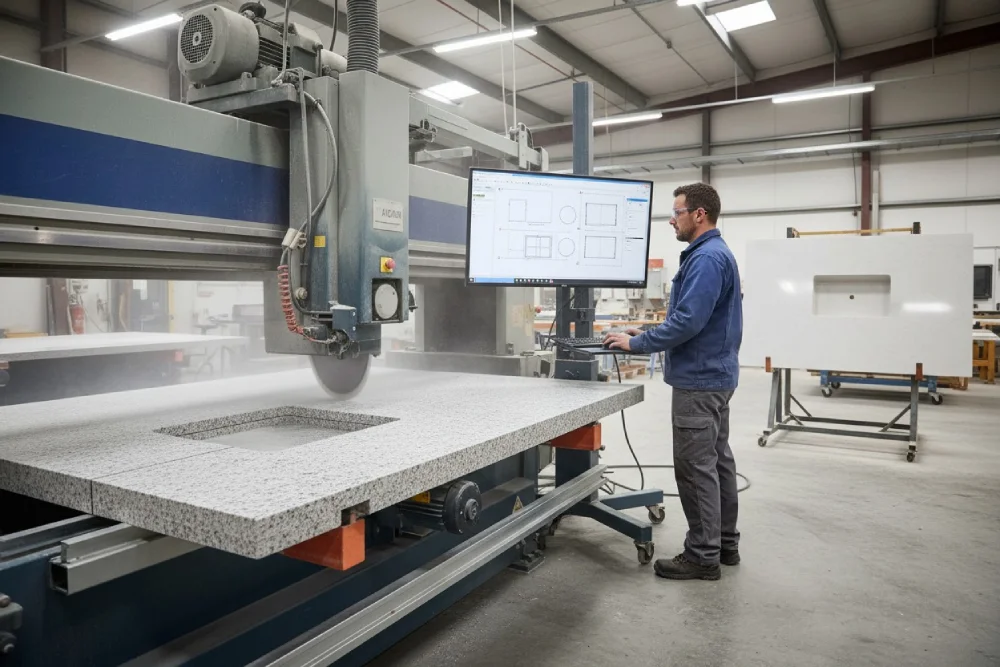
Layout and Cutting Plan Development
Programmers place your countertop pieces on digital slab photos, optimizing multiple factors simultaneously:
Layout optimization goals:
- Seam placement in inconspicuous locations
- Vein pattern continuity across seams
- Visual flow matching throughout kitchen
- Material waste minimization
- Structural integrity at cutout locations
Cut files are generated for bridge saws or CNC machines, including all cutouts, radius corners, curves, and edge profiles. This programming work ensures the physical cutting matches your exact template specifications.
Fabrication Timeline
Typical lead time from template to installation runs 7-12 business days depending on shop workload, project complexity, and material availability. Complex projects with multiple pieces, waterfall edges, or intricate cutouts may require additional time.
Factors affecting fabrication timeline:
- Current shop production schedule
- Number and complexity of pieces
- Edge profile intricacy
- Special features (waterfalls, mitered edges)
- Stone type (some materials require slower cutting)
Phase 2: Homeowner Preparation Before Install Day
While the shop fabricates your countertops, you prepare the space for efficient, safe installation. Proper preparation prevents delays and ensures installers can focus on precision work rather than site problems.
Cabinet and Structure Requirements
Critical cabinet preparation:
- Base cabinets must be permanently installed and secured
- All cabinets must be level—shims applied where needed
- Any changes after templating will throw off the fit
- End panels must be complete and secured
- Support legs and pony walls fully installed
- Corner cabinet access doors functional
Cabinet modifications after templating create fit problems. If you discover issues after the templater visits, contact your fabricator immediately—adjustments may be possible before cutting begins, but become impossible afterward.
Appliances, Plumbing, and Access
Items needed on site or specified:
- Sinks with accurate dimensional specifications
- Faucets with mounting hole requirements
- Cooktops with cutout templates
- Built-in appliances with clearance specifications
- Any accessories requiring holes or cutouts
Pre-installation tasks:
- Arrange plumbing disconnection if not included in your contract
- Arrange electrical disconnection for cooktops
- Empty sink base cabinet completely
- Clear all cabinets under cutout areas
- Remove items stored on existing countertops
Professional stone fabrication includes coordination with your plumber and electrician to ensure proper timing of disconnection and reconnection services.
Clear Paths and Work Areas
Heavy stone slabs require clear pathways for safe transport. Before installation day:
- Clear walkways from driveway to kitchen
- Remove obstacles from stairs and hallways
- Ensure adequate doorway clearance
- Clear driveways for installation vehicle access
- Remove furniture blocking work areas
- Protect or relocate fragile items near work zones
| Preparation Area | Required Actions | Timing |
| Cabinets | Level, secure, complete | Before template |
| Appliances | On site or specs provided | Before template |
| Plumbing | Disconnected | Day before install |
| Pathways | Cleared completely | Day before install |
| Work area | Items removed | Day before install |
Phase 3: Installation Day—Step-by-Step On Site

On installation day, the crew arrives with finished countertops ready to fit precisely to your space. The installation follows a systematic sequence ensuring quality at each step.
Arrival and Protection
The lead installer walks the job with you before work begins, confirming:
- Layout matches your expectations
- Seam locations as discussed
- Sink orientation and position
- Edge profile verification
- Any special feature review
Site protection measures:
- Drop cloths covering floors along transport paths
- Cardboard protection on stairs and thresholds
- Runners protecting finished flooring
- Cabinet protection during removal work
- Adjacent surface covering
Old Countertop Removal
If your contract includes removal, installers carefully extract existing countertops:
- Disconnect remaining plumbing connections
- Remove existing countertop sections
- Remove old backsplash if specified
- Haul away materials per agreement
- Inspect cabinet condition after removal
After removal, installers recheck cabinets for level and structural integrity. They add shims or supports as needed before setting new stone—this step prevents future problems with cracking or uneven surfaces.
Dry-Fitting New Countertops
Each piece is carried in using suction cup lifters and “dry-fit” before permanent installation:
Dry-fit verification includes:
- Wall contact along back edges
- Corner alignment and angles
- Appliance clearances
- Sink cutout positioning
- Overall layout confirmation
Minor scribing, trimming, or adjustments may occur on site to accommodate out-of-square walls or slight variations from template measurements. This fine-tuning ensures perfect fit despite real-world construction imperfections.
Phase 4: Setting, Seaming, and Sink Work
This phase permanently locks your countertops into place. Precision during setting, seaming, and sink installation determines long-term performance and appearance.
Adhesive Application and Setting
Installers apply beads of silicone or construction adhesive on cabinet tops, then carefully set each slab:
- Consistent adhesive bead placement
- Slab positioning using suction lifters
- Level verification as pieces set
- Overhang measurement confirmation
- Support bracket installation where needed
Overhangs are checked against code and industry limits. Brackets or corbels are installed for overhangs exceeding safe unsupported spans—typically 10-12 inches depending on material thickness and type.
Seam Alignment and Bonding
At seams, installers create virtually invisible joints through careful technique:
Seam bonding process:
- Color-matched epoxy or seam adhesive mixed on site
- Pigments adjusted to match specific stone coloring
- Adhesive applied to both mating surfaces
- Seam setters or vacuum seam pullers engage
- Pieces pulled tight together and flush vertically
- Excess adhesive removed before curing
- Surface cleaned for seamless appearance
Properly executed seams are tight, even, and nearly invisible once the adhesive cures. Quality seaming distinguishes professional installation from amateur work.
Sink and Faucet Operations
Undermount sinks require precise installation ensuring waterproof, stable mounting:
- Sink positioned using manufacturer templates
- Clips or brackets installed for secure attachment
- Adhesive applied for permanent bond
- Alignment verified against cutout edges
- Reveal (visible edge gap) checked for consistency
Faucet and accessory holes are drilled if not completed in the shop. Installers use diamond core bits with water cooling, then clean and dry holes to prevent chips and residue around penetrations.
Backsplash and Caulking
Stone backsplash installation follows countertop setting:
- Backsplash pieces set with adhesive
- Alignment verified against countertop edge
- Joint between counter and backsplash caulked
- Color-matched caulk applied at wall junctions
- Silicone sealant at sink perimeter
- All gaps sealed preventing water intrusion
Comprehensive natural stone installation includes proper waterproofing at all joints and penetrations, preventing moisture damage to cabinets and substrates.
| Installation Step | Key Actions | Quality Check |
| Dry-fit | Position all pieces | Wall contact, alignment |
| Setting | Adhesive, place slabs | Level, overhang limits |
| Seaming | Color-matched epoxy | Tight, flush, invisible |
| Sink mount | Clips, adhesive | Secure, waterproof |
| Caulking | Silicone at joints | Complete seal |
Phase 5: Final Steps, Cleanup, and Walkthrough
The final phase ensures performance, safety, and your complete satisfaction before the crew leaves.
Sealing and Surface Inspection
Sealing process:
- Natural stone tops sealed if not completed in shop
- Sealer applied per manufacturer specifications
- Surface wiped and allowed to cure
- Curing time communicated for your planning
Quality inspection includes:
- Chip inspection along all edges
- Scratch check across surfaces
- Seam lippage verification (pieces flush)
- Edge smoothness confirmation
- Overall appearance review
Any issues identified during inspection are addressed before the crew leaves. Minor touch-ups, additional polishing, or edge refinement happen on site when needed.
Jobsite Cleanup
Professional installers leave your space clean and ready for use:
- Dust and debris swept or vacuumed
- Stone cutting residue removed
- Packaging materials removed
- Offcuts hauled away
- Old countertops removed per contract
- Floors wiped clean
- Adjacent surfaces cleaned
- Floor and surface protection removed last
Homeowner Walkthrough
The lead installer conducts a comprehensive walkthrough reviewing:
Walkthrough checklist:
- Seam locations and quality
- Sink installation and alignment
- Any supports added (brackets, corbels)
- Special features (overhangs, miters, waterfalls)
- Edge profile consistency
- Surface condition throughout
- Basic care and maintenance instructions
- Cleaning product recommendations
- Sealing schedule for your stone type
You confirm everything matches the original template and contract, then sign completion documentation. This sign-off represents your acceptance of the finished installation.
Post-Installation Tasks
After installers leave, several items require attention:
Immediate post-install care:
- Plumbing reconnection (usually next day after adhesives set)
- Avoid heavy loads on countertops for 24-48 hours
- No standing or sitting on overhangs until fully cured
- Avoid strong cleaners until sealers cure (typically 24-72 hours)
- Keep sink area dry until caulk fully cures
Ongoing care begins:
- Follow care instructions provided at walkthrough
- Use recommended cleaning products only
- Monitor seams and caulk joints for any issues
- Schedule resealing per stone-specific timeline
Timeline Overview: Template to Completion
Understanding the complete timeline helps you plan around your countertop project.
Pre-fabrication (1-2 days):
- Template appointment scheduled
- Digital measurements captured
- Template transmitted to shop
Fabrication (7-12 business days):
- Template review and confirmation
- Layout optimization and programming
- CNC cutting and edge profiling
- Quality inspection and sealing
Pre-installation preparation (1-2 days before):
- Homeowner site preparation
- Plumbing/electrical disconnection
- Pathway clearing
Installation day (4-8 hours typical):
- Arrival and site protection
- Old countertop removal if included
- Dry-fitting and adjustment
- Setting, seaming, sink work
- Backsplash and caulking
- Cleanup and walkthrough
Post-installation (24-72 hours):
- Adhesive and sealer curing
- Plumbing reconnection
- Normal use begins
| Project Phase | Duration | Key Activities |
| Template | 1-2 hours | Digital measurement capture |
| Fabrication | 7-12 days | Cutting, profiling, finishing |
| Site prep | 1-2 days before | Clear paths, disconnect plumbing |
| Installation | 4-8 hours | Setting, seaming, sink, cleanup |
| Curing | 24-72 hours | Adhesive and sealer setting |
Key Takeaways
- Five distinct phases structure professional installation including digital templating, 7-12 day shop fabrication, homeowner site preparation, installation day procedures, and final walkthrough sign-off ensuring quality at every stage
- Template accuracy drives everything downstream so cabinet modifications after templating create fit problems—contact your fabricator immediately if changes occur before cutting begins
- Homeowner preparation directly impacts installation quality requiring level secured cabinets, appliances on site with specifications, cleared pathways for heavy stone transport, and plumbing disconnection arranged beforehand
- Dry-fitting before permanent setting allows installers to verify wall contact, corner alignment, and appliance clearances while making minor adjustments for out-of-square walls before adhesive application
- Color-matched seam bonding with vacuum pullers creates tight, flush, nearly invisible joints distinguishing professional installation from amateur work with visible seam lines and lippage
- Walkthrough sign-off confirms specification compliance including seam quality review, sink installation verification, support documentation, care instructions, and your acceptance of the completed installation
Frequently Asked Questions
How long does countertop fabrication take after templating?
Typical fabrication takes 7-12 business days depending on shop workload and project complexity. Simple projects may complete faster; complex designs with waterfall edges or intricate cutouts require additional time.
What should I do to prepare for installation day?
Ensure cabinets are level and secured, have appliances on site with specifications, arrange plumbing disconnection, empty sink base cabinets, clear all pathways from driveway to kitchen, and remove items from existing countertops.
Can I modify cabinets after the template is taken?
Cabinet modifications after templating create fit problems. Contact your fabricator immediately if changes occur—adjustments may be possible before cutting, but become impossible afterward.
How long does actual countertop installation take?
Standard kitchen installations take 4-8 hours. Complex layouts with multiple seams, waterfall edges, or extensive backsplash work may require longer. Very large projects occasionally span two days.
What happens during the dry-fit process?
Installers position each piece without adhesive to verify wall contact, corner alignment, appliance clearances, and overall fit. Minor scribing or adjustments accommodate out-of-square walls before permanent setting.
How are seams made nearly invisible?
Color-matched epoxy mixed on site to match your specific stone, vacuum seam pullers drawing pieces tight together and flush vertically, and careful excess removal before curing create nearly invisible joints.
When can plumbing be reconnected after installation?
Plumbing reconnection typically occurs the next day after adhesives and caulk have set. Your plumber should wait at least 24 hours before reconnecting water supply and drain lines.
What should I avoid immediately after installation?
Avoid heavy loads, standing or sitting on overhangs, and strong cleaners until adhesives and sealers fully cure—typically 24-72 hours. Keep sink areas dry until caulk cures completely.
What does the final walkthrough include?
The installer reviews seam quality, sink installation, any added supports, special features, basic care instructions, and cleaning recommendations. You sign completion documentation confirming everything matches specifications.
How soon can I use my new countertops?
Light use can begin immediately after installation. Full use including placing heavy items and using the sink should wait 24-48 hours for adhesives to cure. Avoid harsh cleaners until sealers cure (24-72 hours).
Conclusion
Professional countertop installation follows a proven five-phase sequence from digital templating through final walkthrough. Shop fabrication transforms your precise measurements into finished pieces over 7-12 business days while you prepare the site with level cabinets, cleared pathways, and appliance specifications ready.
Installation day brings systematic dry-fitting, adhesive setting, color-matched seam bonding, sink mounting, and backsplash work—each step building on previous quality controls. The final walkthrough confirms every specification, reviews care instructions, and documents your acceptance of countertops ready for years of beautiful service.Ready to start your countertop project?
Contact Granite and Marble Designs to schedule your template appointment and begin the journey from raw slab to stunning finished countertops.